In this post, I want to try how we can create a blog management system using airtable as a database. Airtable is perfect for creating and managing your content. It’s easy to get started and the possibilities are endless! We’ll use react, NextJS as our frontend, and tailwindcss for CSS. We’ll also use git to store all our code in GitHub and deploy it to Vercel. Keep reading to learn how to create your own blog!
You can see all the code from the github repo: https://github.com/yunuserturk/airtable-blog
Here is the demo of final result: https://airtable-blog-ruby.vercel.app/
What is Airtable?
Airtable is a cloud-based, all-in-one platform that combines the power of a traditional database with the flexibility of a spreadsheet. You can use Airtable to store data, track projects, and collaborate with team members.
Why tailwindcss, react, and nextJS?
Tailwind is a utility-first CSS framework that offers a low-level, atomic approach to building interfaces. In other words, it gives you the raw building blocks (utilities) you need to create designs, without any opinionated styles of their own.
NextJS is a React framework that makes it easy to create server-side rendering React apps. It’s also lightweight and fast, and very effective for websites with lots of pages, which makes it ideal for creating static websites and blogs.
Create a NextJS App
The easiest way to get started with Next.js is by using create-next-app .
Create a project with VS Code, open the terminal and use the command; npx create-next-app
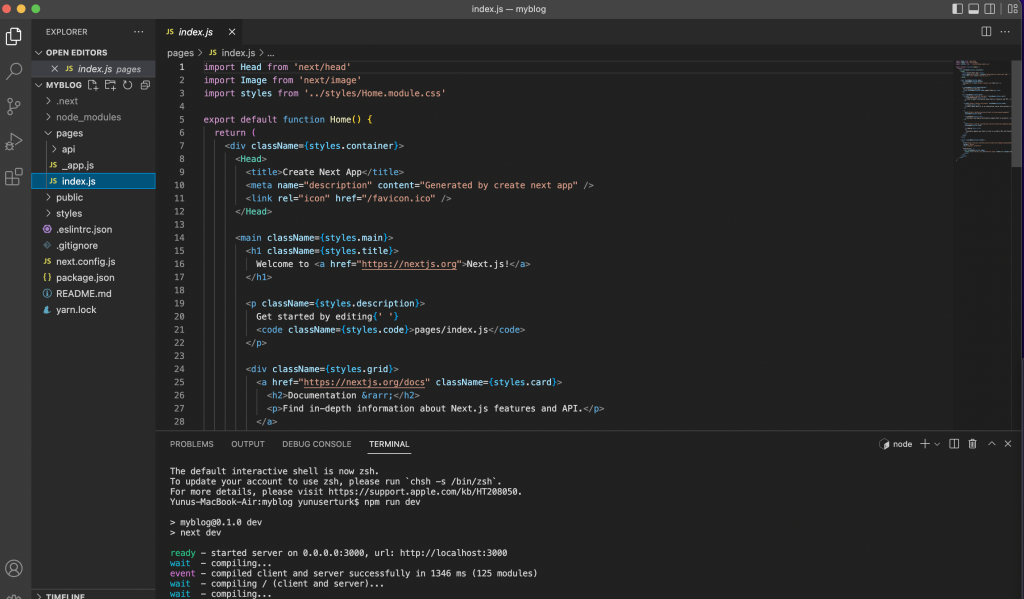
This is our first app. First we’ll edit index.js and create blog home page, and after that create a post page.
I’m creating a very basic UI with tailwindcss;
<main>
  <div className="container mx-auto w-full sm:w-10/12 md:w-8/12 lg:w-6/12 xl:w-6/12 p-4">
    <h1 className="font-bold text-2xl">Welcome to my blog</h1>
    <div className="flex flex-col p-5 rounded-lg border-2 border-gray-200 mt-10">
      <h2 className="text-xl font-bold">Post Title</h2>
      <div>Post Content will be here</div>
      <span className="text-sm mb-6">Post Date</span>
    </div>
  </div>
</main>;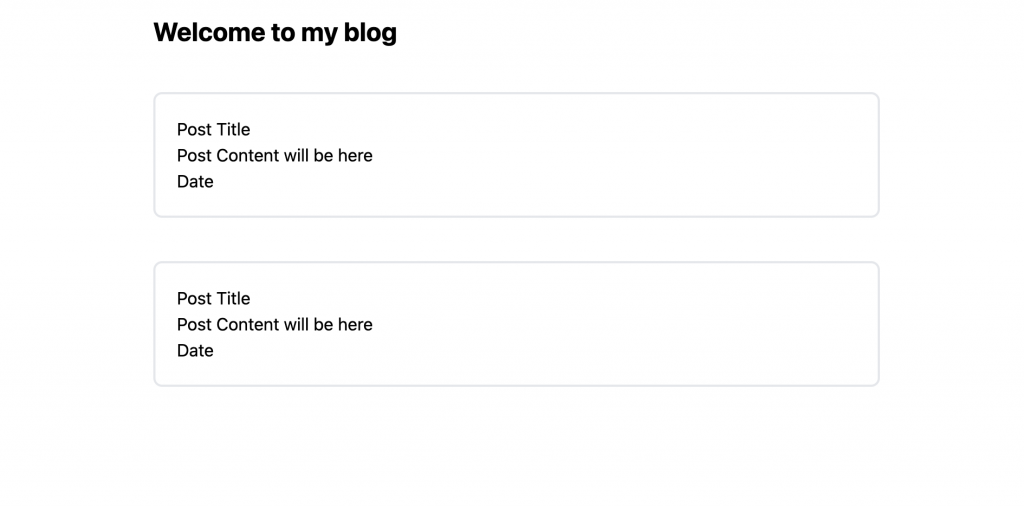
Airtable as a database
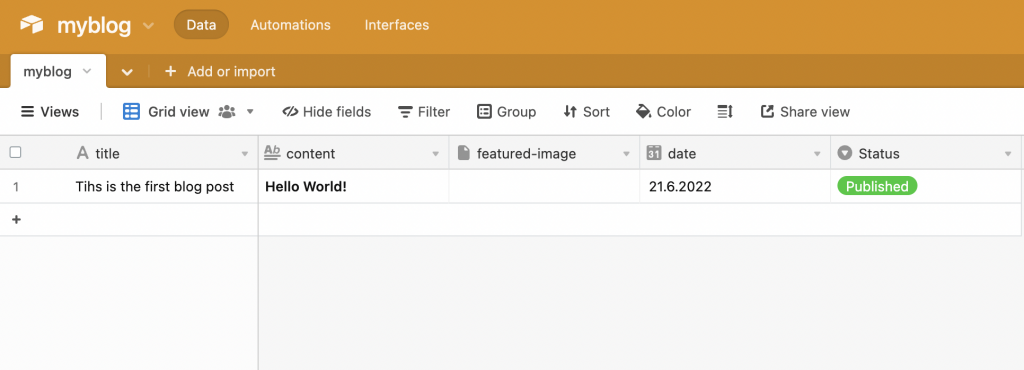
Our blog home page is ready, and we need the airtable as a database. I have created an airtable document named myblog and I’ll use these 3 columns; title, content, and date.
How can we fetch the data from airtable?
Airtable has a nice documented API service. https://airtable.com/api
Also, you can check the documentation and see how can you create something different. For now we just fetch the post title, content, and date.
Airtable has an npm package for development. Firstly we install it on our project. Open the terminal and run this code npm install airtable. After install the airtable package I’ve created a file under components named getPosts.js, and this is for fetch the data from the airtable.
import Airtable from "airtable";

const AirtableBase = new Airtable({ apiKey: process.env.NEXT_PUBLIC_API_KEY });
const AirtableBase_ = AirtableBase.base(process.env.NEXT_PUBLIC_API_BASE);

const table = AirtableBase_.table("myblog");
let posts = [];

const getPosts = async () => {
  posts = await table.select({}).all();
  const posts_ = posts.map((post) => {
    return {
      id: post.id,
      title: post.fields.title,
      content: post.fields.content,
      date: post.fields.date,
    };
  });

  return posts_;
};

export default getPosts;
You must change your airtable table name and API variables.
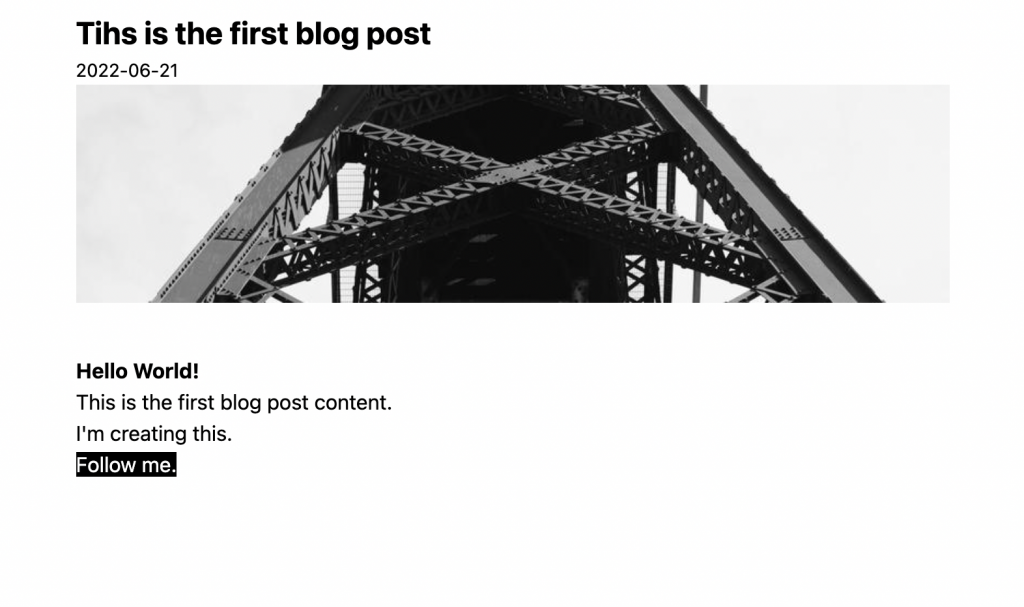
Now we have to create a post page to show a single post. Created a [posts].js in the pages folder. And created a sketchy post UI. For now, I’ve created post pages with post IDs. But it’s not the best practice, I will change this function when I’m implementing SEO functions.
This is how is the [posts].js after airtable fetch codes.
export default function post({ post }) {
  return (
    <main>
      <div className="container mx-auto w-full sm:w-10/12 md:w-8/12 lg:w-6/12 xl:w-6/12 p-4">
        <h1 className="font-bold text-2xl">{post.title}</h1>
        <span className="text-sm">{post.date}</span>
        <img src="https://picsum.photos/800/200" alt="random image" className=" max-w-full" />

        <div dangerouslySetInnerHTML={{ __html: marked(post.content) }} className="mt-10"></div>
      </div>
    </main>
  );
}

export async function getStaticPaths() {
  const posts = await getPosts();
  const paths = posts.map((post) => ({
    params: {
      post: post.id,
    },
  }));

  return {
    paths,
    fallback: false,
  };
}

export async function getStaticProps({ params }) {
  const posts = await getPosts();
  const post = posts.find((post) => post.id === params.post);
  return {
    props: {
      post,
    },
    revalidate: 1,
  };
}
When you create a rich text cell in airtable, airtable gives you the data as markdown data. This is great for us but we have to do some specifications to show it smoothly. First I have installed a package named marked, it helps us to fix that. Open terminal and run command npm install marked. As you can see in the code we should call the package and use for the blog content data. This works great; <div dangerouslySetInnerHTML={{ __html: marked(post.content) }} className="mt-10"></div>
Deployment and the result
Finally I deployed it to vercel. It’s a very basic method of using airtable. Anybody can build very different projects like these.
You can see all the code from the github repo: https://github.com/yunuserturk/airtable-blog
Here is the demo of final result: https://airtable-blog-ruby.vercel.app/